I never thought I’d be the kind of person who puts shrimp in mac and cheese, but here we are. It started when I had leftover shrimp from taco night and a serious craving for something creamy and comforting. I figured, why not combine them?
Turns out, garlic butter shrimp and mac and cheese are a match made in dinner heaven. The shrimp adds this nice pop of flavor and makes the whole thing feel a little fancy, even though it comes together in one pot. And honestly? It’s not that much harder than making regular mac and cheese. You just cook the shrimp first, set them aside, and let them hang out while you make the cheesy pasta. Then you toss everything together at the end.
Why You’ll Love This Garlic Butter Shrimp Mac and Cheese
- Restaurant-quality meal at home – This creamy, indulgent mac and cheese with succulent garlic butter shrimp tastes like something you’d order at a fancy restaurant, but you can make it in your own kitchen.
- One-pot wonder – The pasta cooks right in the cheese sauce, which means less cleanup and more time enjoying your meal instead of scrubbing dishes.
- Ready in under an hour – From start to finish, you’ll have this comforting dinner on the table in 35-50 minutes, making it perfect for busy weeknights when you want something special.
- Protein-packed comfort food – The shrimp adds a good dose of protein to this classic comfort dish, making it more filling and satisfying than regular mac and cheese.
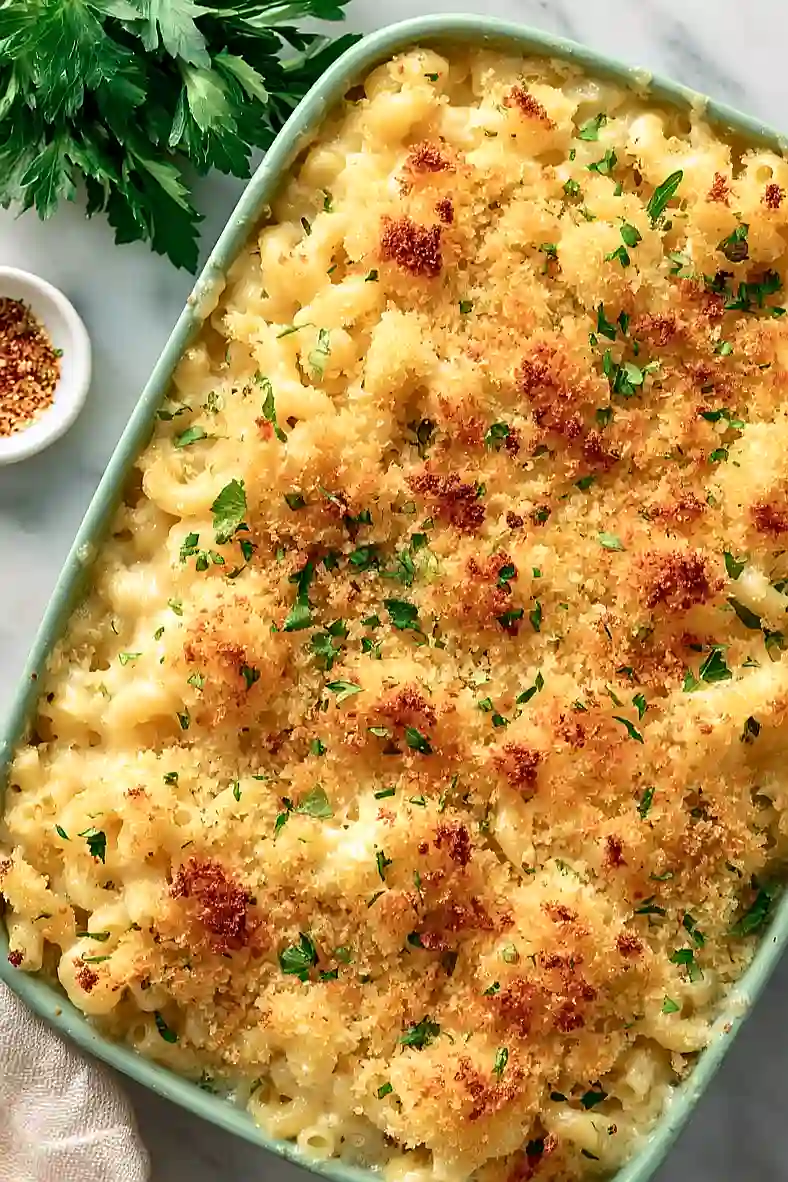
- Crispy, cheesy topping – The panko and parmesan crust on top adds a delicious crunch that contrasts perfectly with the creamy pasta underneath.
What Kind of Shrimp Should I Use?
For this mac and cheese, you can use either fresh or frozen shrimp – just make sure frozen shrimp are fully thawed and patted dry before cooking. Size-wise, medium to large shrimp work best since they hold up well in the creamy sauce and give you a nice bite in every forkful. If you’re buying shrimp with shells on, you’ll need about 650g or 1.5 lbs to end up with the 500g of peeled shrimp the recipe calls for. Whether you go for wild-caught or farm-raised is totally up to your preference and budget, as both will taste great in this dish.
Options for Substitutions
This recipe is pretty forgiving when it comes to swaps, so here are some options if you need to make changes:
- Shrimp: You can use frozen shrimp instead of fresh – just thaw them completely and pat dry before cooking. Chicken breast cut into bite-sized pieces also works great if you’re not a seafood fan.
- Elbow macaroni: Any short pasta shape will do the job here. Try shells, cavatappi, or penne – just keep the cooking time the same and check for doneness.
- Cheddar and gruyere: Feel free to mix and match your favorite melting cheeses. Gouda, fontina, or even monterey jack work well. Just avoid pre-shredded cheese if possible since it doesn’t melt as smoothly.
- Mozzarella: If you don’t have mozzarella, use more of your main cheese or try provolone for a similar mild, melty quality.
- Panko breadcrumbs: Regular breadcrumbs work fine, though they won’t be quite as crispy. You can also crush up some crackers or skip the topping altogether.
- Milk: Whole milk gives the creamiest results, but 2% works in a pinch. You can also use half-and-half for an extra rich sauce, though you might want to thin it with a bit of water.
Watch Out for These Mistakes While Cooking
The biggest mistake you can make with this recipe is overcooking the shrimp, which turns them rubbery and tough – since they cook again when you broil the casserole, aim for just one minute per side in the initial sauté so they stay tender throughout.
Another common issue is adding cold milk to your roux, which can cause lumps and an uneven sauce, so warm your milk first or add it very slowly while whisking constantly.
Don’t skip grating your own cheese from a block, as pre-shredded cheese contains anti-caking agents that prevent it from melting smoothly and can leave your mac and cheese grainy instead of creamy.
Finally, keep a close eye on the casserole under the broiler since it only takes 2-3 minutes for the breadcrumbs to go from golden brown to burnt, and consider placing your oven rack in the middle position rather than too close to the heat source.
What to Serve With Garlic Butter Shrimp Mac and Cheese?
Since this mac and cheese is already pretty rich and loaded with shrimp, I like to balance it out with something fresh and crisp on the side. A simple arugula or mixed greens salad with a lemon vinaigrette cuts through all that cheesy goodness perfectly. Roasted broccoli or green beans also work great if you want a warm vegetable side. If you’re feeding a crowd, garlic bread is always a crowd-pleaser, though honestly this dish is filling enough that you might not need much else besides a light salad.
Storage Instructions
Store: Keep any leftovers in an airtight container in the fridge for up to 3 days. The mac and cheese will thicken up as it sits, but don’t worry – it’ll loosen back up when you reheat it. Just know that the shrimp are best enjoyed fresh, so try to eat it within a day or two for the best texture.
Freeze: I wouldn’t recommend freezing this one since shrimp can get rubbery when frozen and reheated, and the creamy sauce tends to separate. If you really need to freeze it, it’ll keep for about a month, but the texture won’t be quite the same as fresh.
Reheat: Warm it up gently on the stovetop over medium-low heat with a splash of milk to bring back that creamy consistency. Stir frequently so the cheese doesn’t stick to the bottom. You can also microwave individual portions on medium power in 30-second intervals, stirring between each one.
| Preparation Time | 15-20 minutes |
| Cooking Time | 20-30 minutes |
| Total Time | 35-50 minutes |
| Level of Difficulty | Medium |
| Servings | 4 servings |
Estimated Nutrition
Estimated nutrition for the whole recipe (without optional ingredients):
- Calories: 2600-2800
- Protein: 150-170 g
- Fat: 110-125 g
- Carbohydrates: 240-260 g
Ingredients
For the shrimp:
- 1 lb shrimp (peeled and deveined)
- 4 garlic cloves (freshly minced for best flavor)
- 1 tbsp olive oil
- 1.5 tbsp butter
- 1/2 tsp pepper
- 1/2 tsp lemon zest
For the mac and cheese:
- 3 tbsp butter (I like Kerrygold unsalted butter for this)
- 3 tbsp flour (I always use King Arthur all-purpose flour)
- 2 1/4 cups milk
- 2 1/2 cups water
- 8 oz macaroni (uncooked elbow variety)
- 1.5 cups cheddar (sharp variety gives better texture and moisture)
- 3/4 cup mozzarella
- 1 tsp salt
- 1 tsp garlic powder
- 1/2 tsp mustard powder
- 1/4 tsp smoked paprika
For the topping:
- 1/2 cup breadcrumbs
- 1/3 cup parmesan
Step 1: Prepare Mise en Place and Breadcrumb Topping
- 4 garlic cloves, minced
- 1/2 tsp lemon zest
- 1/2 cup breadcrumbs
- 1/3 cup parmesan
- 1 lb shrimp
Mince the garlic cloves finely and zest the lemon, setting both aside.
In a small bowl, combine the breadcrumbs and parmesan, then drizzle with a splash of olive oil and mix until the breadcrumbs are evenly moistened and clumpy—this helps them brown beautifully under the broiler.
Pat the shrimp dry with paper towels; this ensures they’ll sear properly and cook evenly.
Position your oven rack about 6 inches from the broiler and set it to high.
Step 2: Sear Shrimp and Build Garlic Flavor
- 1 tbsp olive oil
- 1.5 tbsp butter
- 1 lb shrimp
- 1/2 tsp pepper
- 4 garlic cloves, minced
Heat the olive oil and 1 tablespoon of butter in a large pot over high heat until the butter foams.
Add the shrimp and pepper, cooking for about 1 minute until the shrimp just begins to turn pink on the bottom—don’t overcook at this stage.
Add the minced garlic and cook for another minute, stirring constantly to release its aroma and avoid burning.
Transfer the shrimp to a clean bowl and set aside; I like to leave any flavorful browned bits in the pot as they’ll add depth to the sauce.
Step 3: Build the Cheese Sauce Base
- 3 tbsp butter
- 3 tbsp flour
- 2 1/4 cups milk
- 2 1/2 cups water
- 1 tsp salt
- 1 tsp garlic powder
- 1/2 tsp mustard powder
- 1/4 tsp smoked paprika
Reduce the heat to medium and add the remaining 3 tablespoons of butter to the same pot, allowing it to melt completely.
Sprinkle the flour over the melted butter and whisk constantly for about 1 minute to create a roux, which will thicken your sauce and add a subtle toasted flavor.
Gradually pour in the milk while whisking to prevent lumps from forming, then add the water, salt, garlic powder, mustard powder, and smoked paprika.
Whisk until smooth and the sauce begins to thicken, which should take 2-3 minutes—this creates a silky, well-seasoned base for the mac and cheese.
Step 4: Cook the Pasta in the Sauce
- 8 oz macaroni
- cheese sauce mixture from Step 3
Add the uncooked elbow macaroni directly into the cheese sauce and stir well to distribute the pasta evenly.
Bring the mixture to a gentle boil, then reduce heat to medium-low and cook for about 8 minutes, stirring occasionally.
The pasta will absorb the liquid and cook directly in the sauce, which means you’re building flavor at the same time you’re cooking the pasta—much more efficient than cooking them separately.
Step 5: Combine Cheeses and Shrimp
- 1.5 cups sharp cheddar
- 3/4 cup mozzarella
- cooked shrimp from Step 2
- 1/2 tsp lemon zest
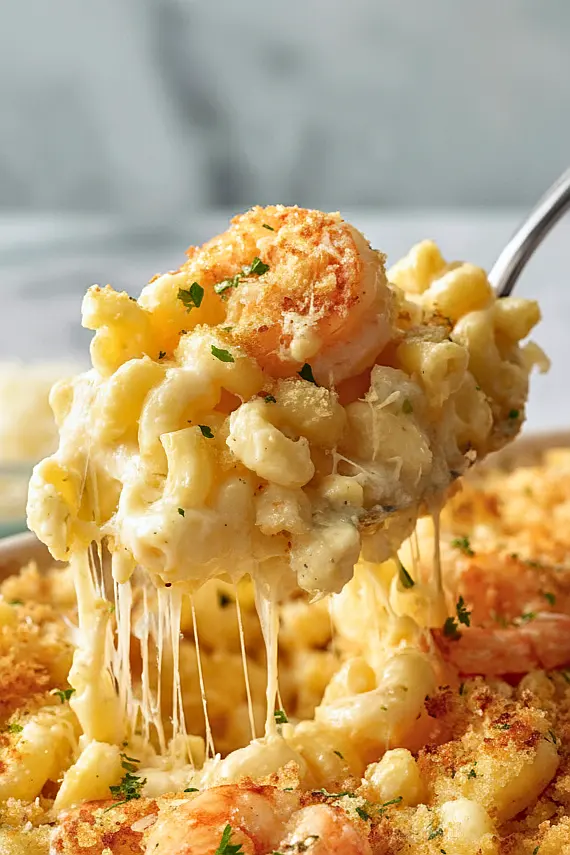
Remove the pot from heat and stir in the sharp cheddar and mozzarella, mixing until both cheeses are fully melted and the sauce is smooth and creamy.
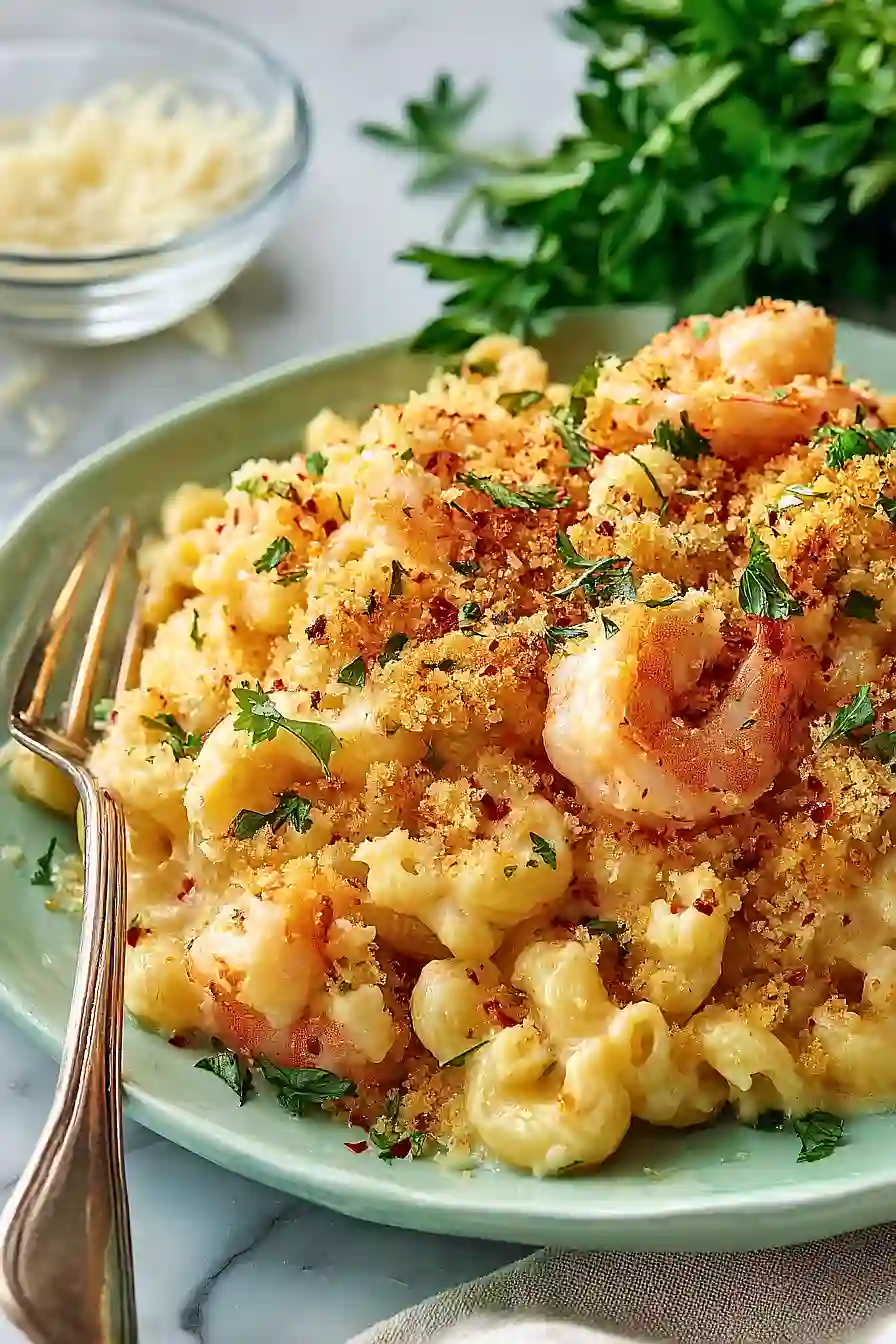
Fold in the cooked shrimp from Step 2 along with the lemon zest, which will brighten all the rich flavors.
The residual heat will gently finish cooking the shrimp and meld everything together beautifully.
Step 6: Finish Under the Broiler
- mac and cheese mixture from Step 5
- breadcrumb topping from Step 1
Pour the mac and cheese mixture into a 9×13 inch baking dish or similar size, spreading it into an even layer.
Top with the breadcrumb and parmesan mixture from Step 1, distributing it evenly across the surface.
Place under the preheated broiler for 2-3 minutes, watching carefully, until the breadcrumbs turn golden brown—you want them crispy and fragrant, not burned.
Remove from the oven and serve immediately while everything is hot and the breadcrumb topping is still crunchy.
Best Garlic Butter Shrimp Mac and Cheese
Ingredients
Method
- Mince the garlic cloves finely and zest the lemon, setting both aside. In a small bowl, combine the breadcrumbs and parmesan, then drizzle with a splash of olive oil and mix until the breadcrumbs are evenly moistened and clumpy—this helps them brown beautifully under the broiler. Pat the shrimp dry with paper towels; this ensures they'll sear properly and cook evenly. Position your oven rack about 6 inches from the broiler and set it to high.
- Heat the olive oil and 1 tablespoon of butter in a large pot over high heat until the butter foams. Add the shrimp and pepper, cooking for about 1 minute until the shrimp just begins to turn pink on the bottom—don't overcook at this stage. Add the minced garlic and cook for another minute, stirring constantly to release its aroma and avoid burning. Transfer the shrimp to a clean bowl and set aside; I like to leave any flavorful browned bits in the pot as they'll add depth to the sauce.
- Reduce the heat to medium and add the remaining 3 tablespoons of butter to the same pot, allowing it to melt completely. Sprinkle the flour over the melted butter and whisk constantly for about 1 minute to create a roux, which will thicken your sauce and add a subtle toasted flavor. Gradually pour in the milk while whisking to prevent lumps from forming, then add the water, salt, garlic powder, mustard powder, and smoked paprika. Whisk until smooth and the sauce begins to thicken, which should take 2-3 minutes—this creates a silky, well-seasoned base for the mac and cheese.
- Add the uncooked elbow macaroni directly into the cheese sauce and stir well to distribute the pasta evenly. Bring the mixture to a gentle boil, then reduce heat to medium-low and cook for about 8 minutes, stirring occasionally. The pasta will absorb the liquid and cook directly in the sauce, which means you're building flavor at the same time you're cooking the pasta—much more efficient than cooking them separately.
- Remove the pot from heat and stir in the sharp cheddar and mozzarella, mixing until both cheeses are fully melted and the sauce is smooth and creamy. Fold in the cooked shrimp from Step 2 along with the lemon zest, which will brighten all the rich flavors. The residual heat will gently finish cooking the shrimp and meld everything together beautifully.
- Pour the mac and cheese mixture into a 9x13 inch baking dish or similar size, spreading it into an even layer. Top with the breadcrumb and parmesan mixture from Step 1, distributing it evenly across the surface. Place under the preheated broiler for 2-3 minutes, watching carefully, until the breadcrumbs turn golden brown—you want them crispy and fragrant, not burned. Remove from the oven and serve immediately while everything is hot and the breadcrumb topping is still crunchy.